Selenium IDE for Automated Testing


Nov 09, 2011
If you need to automate testing of a Web application, Selenium is a good option to consider. First it is an Open Source tool, it uses a friendly environment to record browser actions, it allows you to edit test cases in several programming languages and run test cases in different browsers.
I prepared a quick guide on how to install Selenium IDE, create, run and export a test case.
Selenium IDE
Selenium IDE is a Firefox plug-in to develop Selenium test cases , it provides these features:
- Recording user actions
- Saving user actions as a reusable script
- Context menu in Firefox to add assertions and verifications
- Full editing of the test cases
The add-on works only in Firefox, but tests can be run in other browsers like Internet Explorer, Safari and Opera.
Selenium IDE Installation
- Using Firefox, download the IDE from the SeleniumHQ.
- Select Install Now.
- Restart Firefox.
After Firefox reboots you will find the Selenium IDE listed under the Firefox Tools menu.
Create a test case
- In Firefox: go to Tools>Selenium IDE
Start doing some actions in the browser.
In this guide, I am testing submitting a Google Sign-up form with none of the required fields.
- Click on the Red button to stop recording.
- To save the test case: Click on File>Save
- Enter the file name
- Click on Save
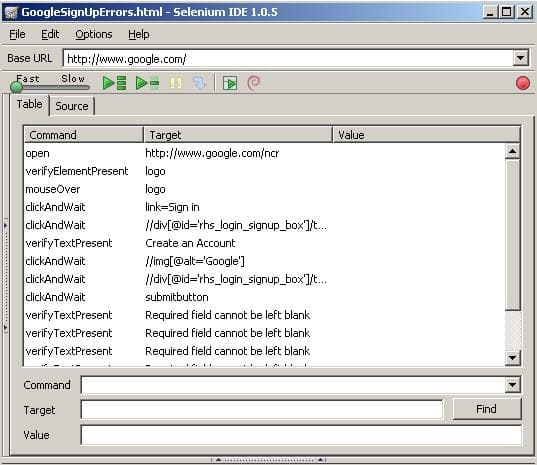
These are the actions recorded in my example, “GoogleSignUpErrors”:

Add verifications and assertions to test cases
First we need to know the difference between verification and assertion. If you need to verify something in a page and stop testing if the element is not present, then you need to use assertion; on the other hand, if you want continue the test even if the element is not present , use verification.
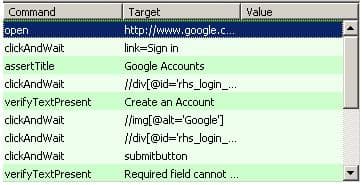
For example in the “GoogleSignUpErrors” test, after clicking on the “Sign in” link in the Google home page, it is necessary to verify that the page is a Google Account in order to continue with the rest of the steps; in this case, you can use the asserTitle command to ensure the HTML title is “Google Accounts”.
To add assertTitle command to your test case:
- Right-click on the action that comes before the assertion.
- In the context menu, click on Insert New Command.
- Choose the assertion command.
- Enter the target value.
See assertTitle action in the Test pane:

Run the test case
- In Firefox: go to Tools>Selenium IDE
- Click on: File> Open
- Select the test case file name
Click on “Play Entire Suite” or “Play Current test case”.
The first play button plays the entire test suite and the second one plays the current test case.
In this case we just have one test case, so both buttons are the same.
Export the test case
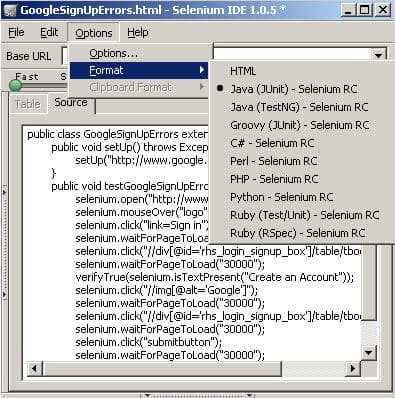
In Selenium IDE, the Test case pane shows in “Table” all the recorded actions in the “GoogleSignUpErrors” test case. If you click on “Source” you will see by default, the HTML format of the script. You can also change the programming language in the menu: Options> Format to see the script in other languages.
For example, the test case in Java looks like this:

As you can see, test cases can be exported to these languages: HTML, Java, Groovy, C#, Perl, PHP, Phyton and Ruby.
To export the test case:
- Go to File>”Export test case As…”
- Select the language, in this example: Java(Junit)
- Enter the file name: “GoogleSignUpErrors.java”
In my next post I am going to show how to install Selenium-RC and run GoogleSignUpErrors.java from the command line.
Related Insights
This site is protected by reCAPTCHA and the Google Privacy Policy and Terms of Service apply.


